solar radiation

The sun is shining more than 300 days a year in this region. Better use its infinite power. 11 November 2017.
I already use solar energy for my electricity supply and for a hot shower (in the greenhouse), but for the heating of my straw bale dwelling I was heavily dependent on the wood stove, apart from the heating effect of the big window of the living room which is exposed to the south. A straw bale building is extremely well insulated and a minimum amount of heating can already have a significant effect. A radiant floor or radiant wall heating, powered by a solar panel seemed to be an interesting option, especially because I can make use of the existing plaster layer of clay inside the walls of the house.
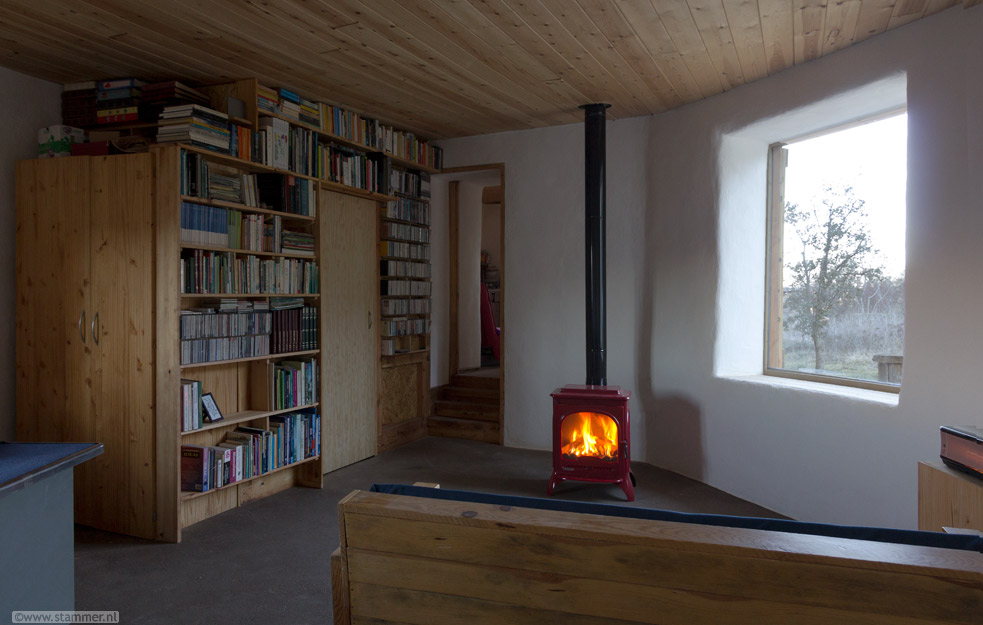
Wood stove and big window in the southern wall provide heating, but a straw bale house offers more interesting opportunities. 4 March 2015.
Heating from radiation is much more efficient than the traditional heating by convection and a constant stream of water of 30 or 40° C through a radiant layer of clay on a wall or floor could do the trick. Solar panels are capable of supplying such temperatures, even the DIY variants, which I elected. The internet offered again almost all of the necessary knowledge, and I started with quite some optimism in the autumn of 2017. In my case it was obvious to go for the walls instead of a radiant floor system as I can make use of the extreme insulation quality of the straw bales just behind the radiant plaster layer of clay. In the floor I don´t have such an insulation layer. There are also commentaries about certain health issues of floor heating as of having a bad effect on blood circulation.
The basic idea of the heating system I wanted to install is relatively simple: the water in 100 m of black (irrigation) tube installed in a coil on a panel is heated by the sun and is driven by a pump to another 100 m of special heating tube imbedded in a clay layer plastered against the straw bale walls inside.
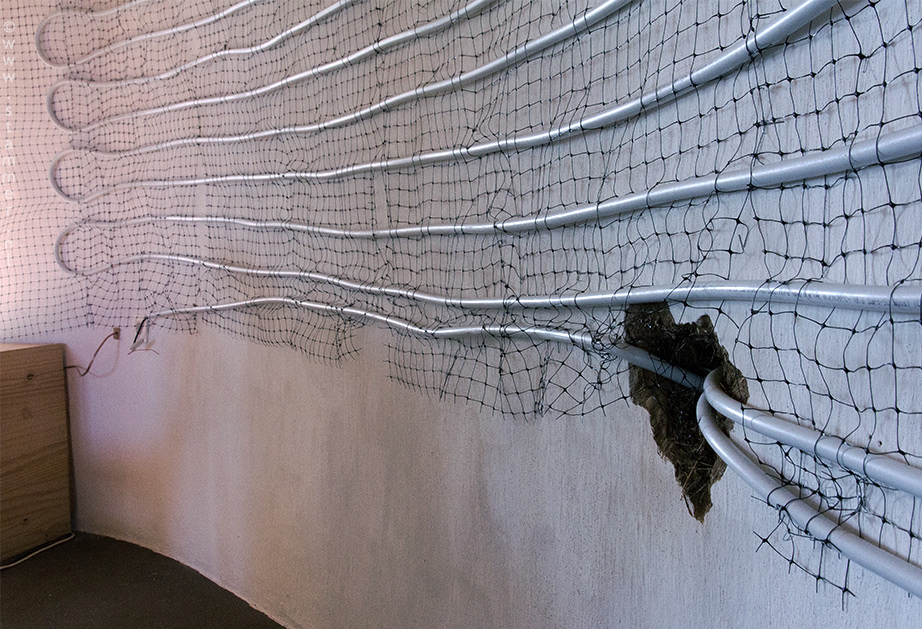
It took me almost two days to sew the 100 meter heating tube into the nylon net, but in combination with more than 1000 staples the installation is perfect. 27 September 2017.
After some research in shops and on the internet I decided to ´sew´ the interior, heating tube in a nylon net, hang this net from the ceiling and fix the net with staples to the wall. The tube was just flexible enough to permit this kind of sewing and the net, bought in a garden centre, was more than strong enough to hold the weight. I chose 7 meters length of the round western wall for collocation, giving a quite even radiation through the whole space of the living room. Around 1000 staples in the wall fixed the whole system (7m x 2m) neatly to the wall. This way I saved a considerable amount of money, time and energy in comparison with the standard systems sold on the market. Then I had to apply the clay plaster between the tubes.
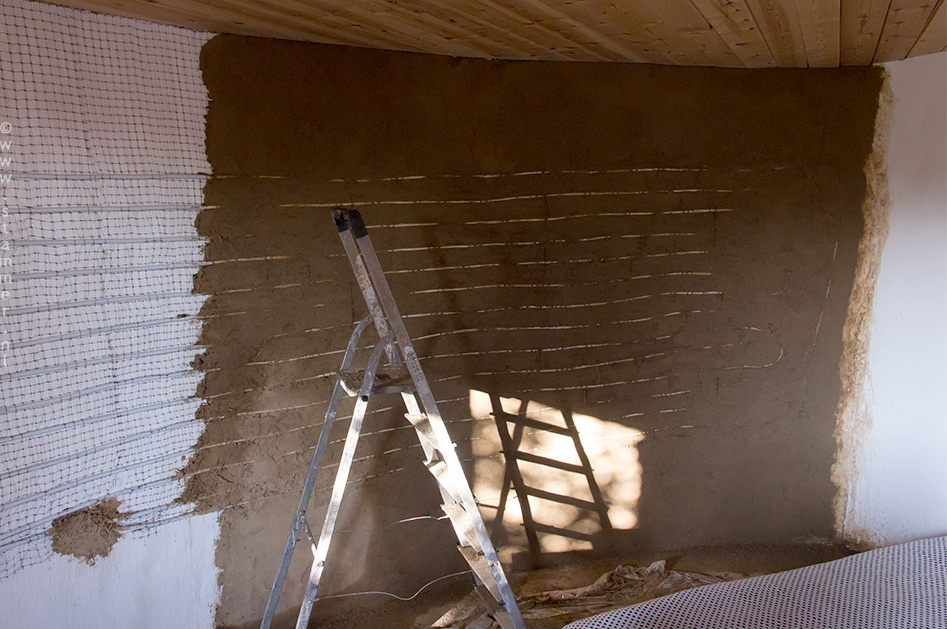
Applying the clay mix with a trowel. Before applying I sprayed abundant water and once applied it is important to let it dry completely before starting with the next layer. 4 October 2017.
The mixture was based on experience and consisted of 25% clayey soil from my own terrain and 75% sand, both of them screened for a fine grain. I had read some warnings about difficulties of applying this plaster on a white washed wall, but it went well, just making the walls a little bit wetter than usual before applying the plaster. Two layers were applied, giving a total thickness of the new layer together with the existing layer (with the whitewash in between) of about 5 to 6 cm, which is quite nice, not only for the radiation of the heat but also as a buffer to help stabilize temperature and humidity. Afterwards the walls were whitewashed again, and the situation was almost exactly as before: only the digital thermometer, connected close to the tube, shows.

This digital thermometer, installed on an electricity socket, is connected with its sensor close to the heating tube. After whitewashing the wall it´s the only element noticeable of the heating system inside. It keeps track of the temperature near the point of entrance where the water is hottest. On a typical sunny winter day it stabilizes around 28°C. 30 October 2017.
The interior system is connected to the exterior system through a hole in the southern wall. For the exterior solar panel I used the much cheaper ordinary irrigation tubes (16mm). Connection with the interior tube was supposed to be a problem because this tube is must be connected to metal connectors, but the ordinary PE irrigation connector used for irrigation has worked fine since then. The black tube was coiled on a wooden structure of OSB boards and recycled pallet boards. For some insulation and light reflection I covered the OSB board with an aluminum insulation sheet before installing the tube. The coil was covered by plexiglass (or poly(methyl methacrylate) (PMMA) which is stronger and easier to cut, transport and manipulate than glass.
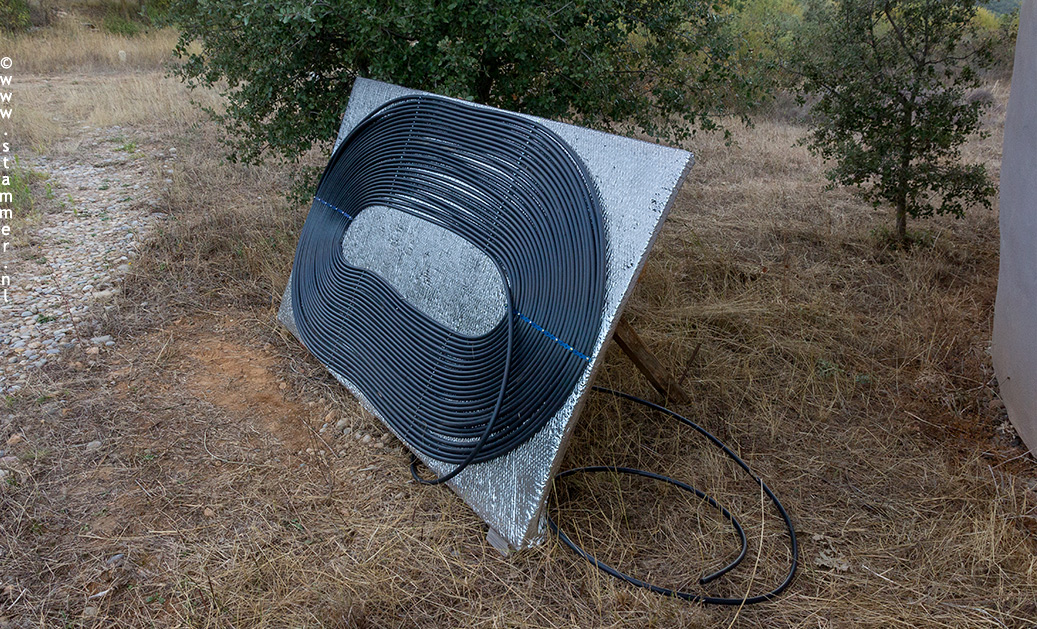
The DIY solar panel, just two meters separated from the interior tube system and exposed to the south. It measures about 2 x 1 meter and gives support for 100 meters of black irrigation tube. 18 September 2017
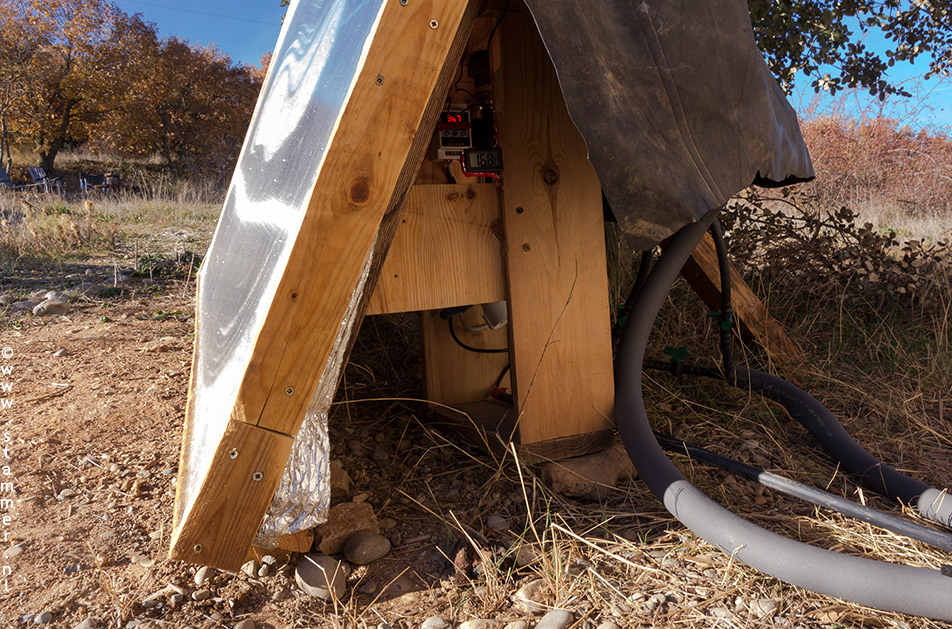
Pump, thermostat and thermometers are installed at the back of the solar panel. The tubes are insulated with foam rubber socks. The front of the panel is covered with a sheet of plexiglass. 28 November 2017.
Then the two systems had to be joined and connected to a pump. I bought an ordinary central heating pump, using its lowest power setting (around 8 watt). Perhaps you can try your luck with much cheaper pumps from China via internet, but I preferred the reliability (and expertise) of a good pump from a good local shop. To get the 20 liters of antifreeze water mix into the system, without air, was a bit tricky. The pump didn´t have the power to just suck the antifreeze water from the water tank. After some trying and testing the solution was to connect the system to the water mains and first fill the system with ordinary water. Once working, the pump was able to suck the antifreeze mix from the tank. I stopped the sucking when the outlet water turned antifreeze blue.
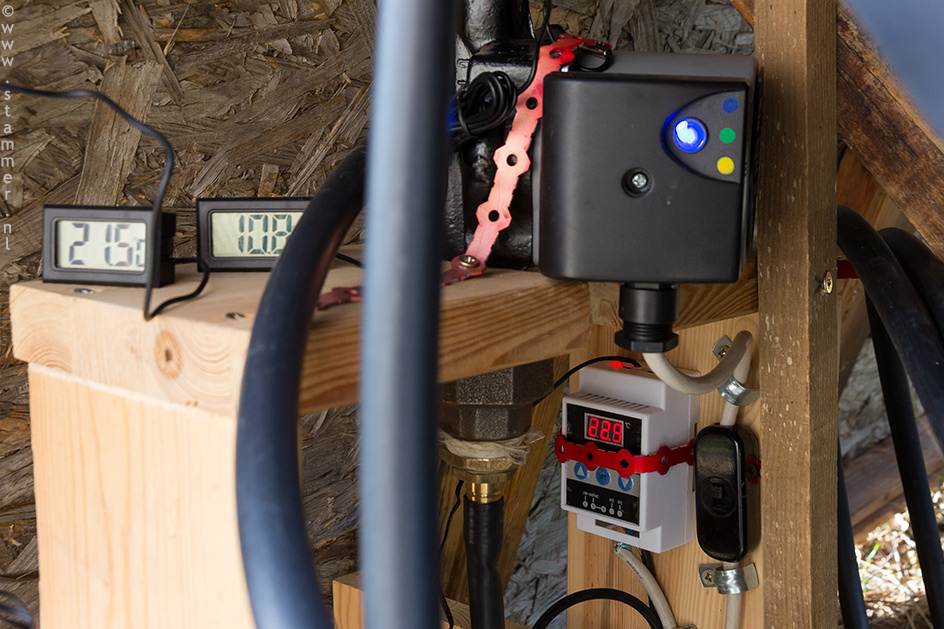
The pump works almost without noise, consuming less than 10 watt in its lowest power setting. It´s only working when the sun shines, and then my regular electric solar panels are also working, so no power issues here. 23 November 2017.
The pump is regulated by a thermostat, which this time I did bought via the internet. The first one failed however but the next one (both of them around 15€) does the job fine, that is, starts the pump when the temperature gets over 30° C and disconnects when the temperature drops below 28°C (values obtained after some testing). The temperature is measured with a probe located in front of the solar panel inside it´s own ´greenhouse´ box.
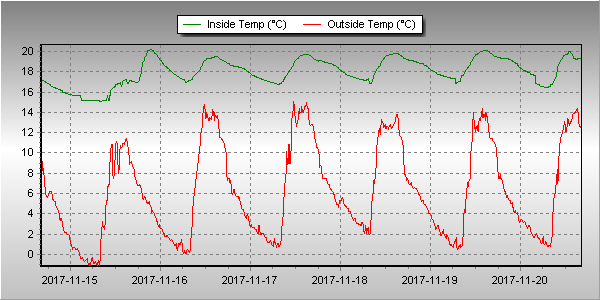
Data from my weather station: inside (green) and outside (red) temperatures. On the 15th of November 2017 the wood stove was lighted because of cloudy cold weather. Then the sun started to shine and was able to maintain temperatures around 19°C inside without the stove.
At the time of writing (midsummer) I have tried the system for one winter season and the results are more than satisfactory. I saved around 35% of wood for the stove. Spring was exceptionally cloudy this year so the results might even get better in the future. It is especially during early spring when the radiant wall might shine. Temperatures are still chilly then but days are getting quite longer and the sun quite stronger. Also the general climate inside has improved, perhaps just 2°C higher, but living with 18° instead of 16° (without the wood stove) makes a difference.
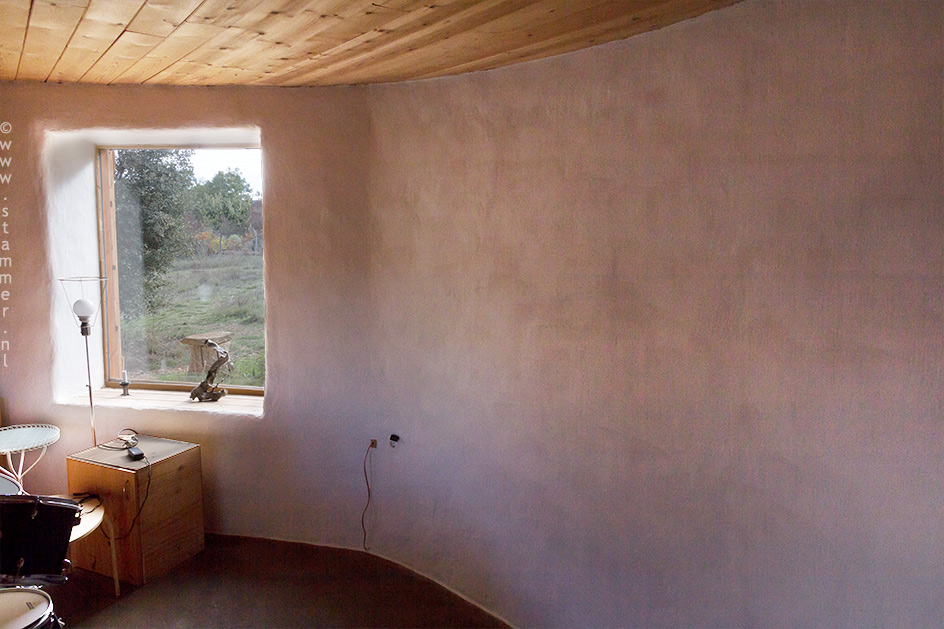
After applying the white wash, ready to radiate solar power. The heating is invisible and noiseless. 10 November 2017
I also tried the system in summer, activating the system at night as a means to refresh the inside climate, but the effect was minimal. I suppose the difference (averaging 23°C inside and 19° outside at night) is too small to be effective.